The TWC interface: What you can see: a 7x7
area (an acre) with yourself in the middle.
Grey squares around (depending on your screen size/resolution) denote areas you
have yet to explore. There are various toolbars and windows in TWC, some of
which you can see immediately, others can be opened or closed using the 'view'
menu:
|
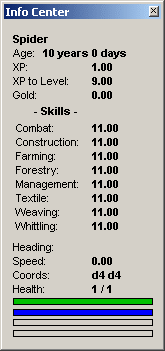
The Info Center shows you your
skill levels, health etc. Your
health at the start is just 1, you have 0 gold,
and each skill is at level 11.
The green bar represents your health level - this bar goes yellow and then red
as your health goes critically low. You can set the levels at which it should
change color by selecting Game->Options on the TWC menus.
The blue bar is your thirst level: currently this is not in use
The brown bar is your poo level - this fills up a little more each time you eat.
Once it is full, you need to use an outhouse
before you can eat again.
The red bar is the action bar. You can queue up to 5 actions here which your
character will then carry out. If you wish to cancel the actions in your queue,
use the stop button. The first action in the queue is already being carried out
- this cannot be cancelled.
|
 |
|
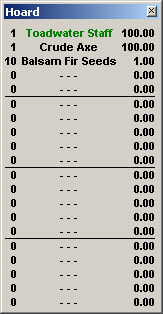
The hoard shows what you are currently
carrying: You will only have a 'crude axe', 10
balsam fir seeds, and a level 100
staff to begin with. The first figure is the quantity of the
item which you are carrying, the last figure is the value of the item (per
piece).
If there is an item which is in green, this is the item you currently have
selected. This means that when you click on a square next to you, you will use
this item. If you have an axe selected, you will chop; if you have a seed
selected, you will plant it etc. Of course, if the square you click on is not
suitable for using the item you have selected on, then you will get an error
message.
|
 |
|

|
The whittling toolbar allows you to make
items out of wood. Select some wood in your
hoard and then click one of the buttons on the whittling toolbar to attempt to
make a new item. |
|
|
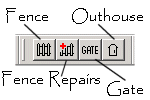
The construction toolbar allows you
to construct items out of planks and
fences. Select a plank (for a fence or an outhouse), two planks (for a
gate), or two pieces of fencing (for fence repairs) in your hoard and click the
appropriate button.
|
|
|
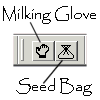
The textile toolbar allows you to
weave items. You need 10 beggars cloth and 10 beggars
yarn. Select the 10 beggar's cloth (you will need to have 10 beggar's yarn
also in your hoard) and click the appropriate button to attempt to make a
beggar's milking glove or beggar's seed bag. For higher level items you need
more material: 20 each of cloth and yarn for middling items, 30 each for
imperial. |
|

|
The stop button clears queued items out of your
queue. The first action cannot be cleared, as this is already being
done. |
|
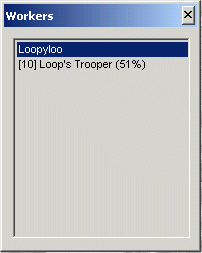
The workers window allows you to view and
select any workers you have hired to do jobs around your base.
|
 |
|
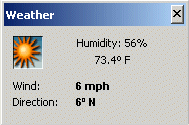
The weather window shows you the current
humidity, temperature, windspeed and direction.
|
 |
Lots of tasks in TWC can be done using keyboard shortcuts instead of the
mouse:
View Shortcuts
How to begin: Please read the
Introduction which gives detailed instructions on how to get started in
the game.
Aims and Objectives: Your aims are whatever
you choose. Some ideas are:
Introduction to your skills: There are 9
skills in toadwater, these are combat,
construction, farming, forestry,
management, poo textile,
weaving, and whittling. More
details about each one are below. Each time you perform an action in Toadwater,
you gain two types of experience points. One is overall experience,
in this you normally get one point for each action, ie one point for each chop
with an axe, one for planting a tree, etc. This determines your health. The
other sort of experience points are skill experience points. These go towards
improving your various skills, and the amount of points you get, and the skill
they go into, is dependent on the action. For example, when you chop a tree
with an axe, you get (axe level) points added to your forestry skill. However,
this does not mean that for each chop with a level 1 axe, you get an extra
level added to your forestry. Your forestry level is worked out from your
forestry XP but the higher your skill gets, the harder it becomes to get to the
next level (you need more experience points to get to the next level). You also
gain one level in all of your skills, each time your in-game age goes up by a
year.
The other way to improve your skills, at least in the case of Combat,
Construction, Farming, Forestry, Management, Poo and Whittling, is to place a
magazine into your outhouse . Now
every time you poo in that outhouse, you get XP points added to whichever skill
the magazine relates to, for each piece of poo you 'drop' there. This is
currently the only way to (permanently) improve your combat skill.
Combat: There is as yet no combat in
Toadwater. You may wish to improve this skill in anticipation of a combat
system being added one day - however, combat is not included in the
ranking system and you are likely to get some warning if its addition
is imminent! Combat skill can be temporarily increased by eating
Red Devil radishes.
Construction: Your construction skill
is used for making fences,
gates, and outhouses from
planks, and fence repairs from
fences. Your construction skill can be temporarily increased by eating
Cherry Belle Radishes. The easist items to construct are fences and
gates, which use up one plank each, and gates which use two planks. Fence
repairs are twice as hard to make as the other items and require two pieces of
fencing.
Farming: Your farming skill determines how
good a crop you will get when you plant Radish
or Industrial Hemp seeds. Your farming skill
can be temporarily increased by eating China Rose
radishes. More about farming in the Advanced section.
Forestry: Your forestry skill determines
your success in planting trees. Your forestry
skill can be temporarily increased by eating Crimson
Giant radishes.
Management: Your management skill
affects the speed at which your workers complete
their jobs. It also determines the chances of a worker finding one or more
seeds when s/he chops down a tree. Management skill can be temporarily
increased by eating Plum Purple radishes.
Poo: Your poo skill determines
how many times you can eat before your poo bar becomes full and you have to
visit an outhouse. Your poo skill can be increased by pooing, and by reading
'poo' magazines while you are in the
outhouse!
Textile: Your textile skill affects the
results of the following stages in the industrial hemp process:
Breaking and Scutching, Hackling, and Spinning. There is no radish to increase
your textile skill, as this is considered an 'elite' skill. However, eating a
gold radish increases all of your skills by 10 percent for an hour,
including textile.
Weaving: Your weaving skill determines
your success in weaving gloves and
other items from cloth and
yarn, and the amount of cloth you can produce. There is no radish to
increase your weaving skill, as this is considered an 'elite' skill. However,
eating a gold radish increases all of
your skills by 10 percent for an hour, including weaving.
Whittling: Your whittling skill is used
for making items out of wood such as
planks, taps etc. Your whittling
skill can be temporarily increased by eating White
Icicle radishes. The easiest items to whittle are mallets, planks,
shovels, taps and posts. Birdhouses are twice as hard as these, scutching
swords 4 times as hard, idols and oars ten times, and clogs 20 times as hard.
Regaining Health: You regain
health in the following ways:
-
Standing still
-
Eating from a fully grown tree
-
Eating radishes
-
Drinking Squirrel Milk
-
Dying(!)
When standing still, your health normally regenerates at a rate of 0.1 point
per minute. However, if you are standing on a tree, your health gain per minute
is (tree age in days) / 100, with a minimum of 0.1 health points.
Whilst standing on a tree, you can eat fruit from its branches by pressing 'e'
(or choosing 'Eat' from the 'Actions' menu. This will give you the same health
gain as you get each minute from standing on the tree. However, you can only
eat until your poo bar gets full up - once
it is full you will need to visit an outhouse
before you can eat any more.
If you manage to buy or grow some radishes, you can eat
them, they give you health as well as other bonusus. The best radishes for
health are the French Breakfast Radsih, which
gives you 10 health points, and the Gold Radish,
which fills up your health bar. Other radishes give you an amount of health
equal to the value of the radish - but don't eat compost
worms because they give you -5 health each!
Squirrel milk also gives you some health, 3
points per drop. However, squirrel milk is quite valuable so you should only
use it for health as a last resort.
When you die, you reappear with 10 health.
This is not recommended as a good way to regenerate your health, particularly
since if you die more than 10 times your account will be vaporized!
Expanding horizons: Now that you have got
accustomed to the Toadwater Interface and learnt how to make items from wood,
you will also have gained enough health to move futher afield, and you now have
more options about what you should do. It will soon be time to leave the safety
of cloud world, and jump down into the real world. Remember that once you are
in the big wide world, other people may come and cut down your trees, take your
idols and taps, and perhaps even fence you in. You will need to be able to
protect yourself by making lots of fencing, and building a base. You will also
need enough health points to find a space big enough for your base, some areas
are more crowded than others so this can be quite a task.
Building your own base: When you reach level
45 or 50, it is time to move out of your starting
Cloud World and look for a place to set up your own base. You need
quite a big space so do your research before you start building. You can always
move again later though! Fence off as big
an area as you think you need, or as big as you can create fences for, using
the highest level fencing you can manage to make. To build a fence,
first construct fencing materials from planks by selecting the planks in your
hoard, and then clicking the 'Fence' button on the construction toolbar. Now
place the fence on a square next to you, and use your mallet to pound it in
until the icon changes to a fence icon. You cannot build fencing within the 4
starter worlds, as these are for transit only. Plant
some balsam fir trees strategically within your new base to use as 'healing
trees' - as they get older they will become good resting places.
Using workers: Once you have some cash and
a fair number of trees, you may wish to start hiring
workers to help you around your base. Workers can cut down trees,
fertilize land, build and remove fences, and remove roads. The speed at which
they work is determined by their farming, forestry and construction skills, and
your management skill. To give a worker a job, open the workers window
by pressing Ctrl-W or choosing 'Workers' from the Actions menu. Now click on
the worker's name in the workers window, and then select a tool in your
inventory. You will see the name of the worker and the tool selected, displayed
in green letters at the top of your screen. Now click on the square where you
want the worker to work. This may be any square within your range of vision.
Before you hire a worker, it is a good idea to decide what jobs you want done,
and use this to choose which worker to hire. For example, if all your jobs are
forestry jobs you would not want to get a worker with a low forestry skill, as
it can take them all day to chop a single tree! See also
workers.
Advanced items: The following is a
description of how some of the more advanced toadwater features work, things
that you will not attempt until you have either saved up a lot of money, or
gained a high level in certain skills. They are arranged in approximately the
order you should begin to work on them! For example, do not try Industrial
Hemp farming until you have done a lot of Radish
farming, and you will be unable to get the high level seeds needed for
birds before you purchase your first statue!
Farming: The first type of farming you
will do is Radish farming. To grow a crop of radishes, first fertilize a square
using 100 pieces of poo (grandma's can be bought from the store, or you can use
your own from an exploded outhouse), or 10 compost worms. You can also
fertilize using Enriched Bird Poo but this is more costly and the only
advantage is that your radishes will grow in 30 minutes instead of an hour.
Next buy 100 radish seeds from the store. Then select them in your hoard and
click the fertilized square. Once the radishes are fully grown, step onto the
square and click yourself to open up the radish screen. You will see a number
of radishes, how many you get is dependent on your farming skill. To get a full
crop you need farming skill 200! It is advisable to raise your farming skill a
little, using a magazine - otherwise you
may get empty crops!
There are various different types of radishes, each of which has a different
purpose:
-
Cherry Belle: The construction
radish. Eat up to ten at a time to temporarily improve your construction skill.
-
China Rose: The farming radish. Eat
up to ten at a time to temporarily improve your farming skill.
-
Crimson Giant: The forestry
radish. Eat up to ten at a time to temporarily improve your forestry skill.
-
French Breakfast: The health radish. Eat as
many as you like, each one restores 10 health points.
-
Gold Radish: The rarest radish! Eat
one to improve all of your skills by 10 points for an hour, and lots of other
benefits when combined with squirrel milk!
-
Plum Purple: The management radish.
Eat up to ten at a time to temporarily improve your management skill.
-
Red Devil: The combat radish. Eat up
to ten at a time to temporarily improve your combat skill.
-
Round Black Spanish: The poo radish. Each
one you eat adds 10 poo to your current poo level.
-
White Icicle: The whittling radish. Eat
up to ten at a time to temporarily improve your whittling skill.
You should also get some compost worms in your crop, these are used for
fertilization and for attracting birds from their trees into your hoard.
You might also get fungi in your crop, if you are extremely lucky. There
are two types of fungi, Death Cap Mushrooms
which remove one death when you eat them, and
Flaming Fungus which has no use at this time.
See also: Radishes.
Statues: If you want to place a statue on
the ground, you will first need to plant a
creeping red fescue lawn on the square: fertilize
the square to 100% using dried poo,
compost worms or EBP, buy 100 creeping
red fescue seeds from the store, and plant them in the fertilized soil. The
grass takes one hour to grow. Now you can place your statue on the square and
wait for bird droppings to appear (see below for more about this)!
Once you have got some bird droppings on your statue, you can scrape them off
by walking onto the statue. When you do this, for each dropping a check is done
to see if it has a tree seed in it - there is a one in (ten times tree level)
chance that it will contain a seed, for each tree, except for the top ten seeds
which are not available from statues. The highest level seed is checked for
first, if a seed is not found then it looks for one of the next level, down to
level 11. If no seed has been found then you get a random amount of EBP,
between 1 and 10 pieces. There is no skill check on this.
Statues are the only way to get seeds for trees above level 1 (apart from
trading with other players). Whenever someone reaches the top ten in the
ranking
, they are given a statue to commemorate their achievement! 100 of each statue
are initially available, at a price which reflects the current ranking of the
person. High level statues, and those of people expected to rise through the
rankings, are usually snapped up quickly - but each player can only buy one
statue per hour to stop people from hoarding too many of them. Statues are used
by some players as an investment: If you spot someone who is playing a lot and
is likely to improve their ranking, you can buy their statue and then sell it
back to the shop later on. However, the statue has to be put on the ground,
otherwise its value remains the same it was when you bought it.
The ranking of the player depicted on the statue also determines the frequency
of bird droppings appearing on the statue. When you hover over the statue you
will see a time, the basic time is 10 minutes for the highest statue, plus an
additional 10 minutes for each level you go down in the rankings. However, you
also get a bonus which reduces this length of time, dependent on the length of
time the statue has been left on the ground without moving. Over a long period
this can make a significant difference to the timer!. This timer shows you the
frequency with which birds pass your statue, and each time a bird passes there
is a one in ten chance that they will leave you a dropping! So for a statue
with a 10 minute timer, you can expect to get one dropping every 100 minutes,
on average. This happens whether you are on or off line though so it's not as
rare as it sounds!
Birds: There are 5 types of
birds currently residing in the toadwater trees, each with a different
purpose, detailed below.
To attract a bird to one of your trees, first whittle a
birdhouse
, and then attach the birdhouse to the tree. The higher level the birdhouse,
the sooner you can expect to get a bird in it. The exact amount of time is
random and varies between bird types.
Birds can be summoned into your hoard by tempting them with a
compost worm. You can only summon birds that belong to you (except in
the special case of a passenger pigeon that has been lodged on a ponderosa pine
tree). You can scare away birds that belong to you by feeding them a piece of
dried poo, for example if you want to chop down the tree that they are
living on. A bird has a number of uses, this number is set when they first
arrive at a birdhouse and is a random number between 1 and a maximum which
depends on the age of the tree. For each 100 days old the tree is, the maximum
number of uses increases by 1. So a 200 day old tree will attract a bird with a
maximum of 3 uses.
-
Bearded Vulture: This bird resides in a western hemlock tree. When used on
another player anywhere within your field of vision, it picks them up and
carries them away, dropping them randomly in another world square. The only way
to avoid being 'birded' by someone with a BV is to hide in an outhouse - or run
away! Once summoned, it will only stay in your hoard for 10 minutes.
-
Passenger Pigeon: This bird resides in a horse chestnut tree. You can carry one
in your hoard for up to 100 minutes, and when placed on the ground, it picks
you up and carries you back to its birdhouse. A pigeon can also be lodged in a
birdhouse attached to a ponderosa pine tree, where it will stay until someone
summons it into their hoard, at which time it returns, with that person, to
it's original birdhouse. Once lodged in the ponderosa pine tree, the pigeon can
be used by any player who finds it, but there is no way of telling where it
will take you.
-
Sharpie: This bird resides in a quaking aspen tree. It is your lookout, when
placed on the ground next to you it will inform you of any other players who
are currently in the world square that you are in. Useful for checking that
no-one is attempting to breach your defences!
-
Wood Duck: This bird resides in a black tupelo tree. When summoned, it
immediately carries you to 'South Winter Island'
(SWI), a snowy landmass where players can trade quickly if both have wood
ducks. One day SWI will have player-owned shops selling items unavailable in
the shop. After 20 minutes, the wood duck will return to its birdhouse, taking
you with it. If you want to return earlier, simply place the bird on the
ground.
-
Yellow-Bellied Sap-Sucker: This bird resides in a yellow buckeye tree. When
placed on the ground, it goes around all the trees within your field of vision
and collects the sap from them, provided there
is space in your hoard. You must use your sapsucker within 10 minutes of
summoning it, otherwise it will return to its tree.
Industrial Hemp: The process of growing hemp
stalks and turning them into cloth is a complicated and expensive one. It is
advisable to get your farming skill up to somewhere near 200 before attempting
any hemp farming.
Thanks to Jarak for the following explanation of the full process: Planting:
-
fertilize the ground the same as for radish farming.(100 poo or 10 Compost
Worms (recommended) or EBP).
-
Remember to eat your China Rose radishes before planting. (This boosts your
farming skill for a short period)
-
Plant 100 hemp seeds, bought from the shop for 1000 gold.
-
Wait 2 hours for the seeds to grow (or one hour if planted in EBP).
-
Harvest the Hemp Stalks (Each crop will have 15% Compost Worms (on average))
Retting, Breaking and Scutching
-
Take 100 hemp stalks.
-
Put them on the ground to Ret.
-
Retting takes from 1 hr 5 mins to 3 hrs 15 mins, but is normally about 2 hours.
-
When a field is not retted fully it shows a (-) in the tool tip.
-
When it is over done it shows a (+).
-
When it is just right the image gets the button bevil / 3d effect and the
tooltip just says 'Retting Hemp'.
-
To Break & Scutch the field, use a scutching sword on it.
-
The better the scutching sword, the more fibres you will get, so wax your sword
with your best sap!
-
You will get raw hemp fibers and seeds back, the higher your textile skill the
more you get.
Hackling
-
Buy a hackling machine, place it on the ground.
-
Select your fibers. You need 100 fibers per click on the hackling machine.
-
This will convert the Raw fibers to low grade slivers.
-
You can hackle the low grade again to get medium and the medium to get High
grade fibers, but the amount is reduced each time.
-
The hackling machine lasts for 1000 uses before it must be replaced.
Spinning
-
Buy a spinning wheel, place it on the ground.
-
Select 100 low, medium, or high grade sliver in your hoard and click on the
spinning wheel to make yarn.
-
The quality of the yarn is determined by the quality of the sliver used.
-
A spinning wheel lasts for 1000 uses before it must be replaced.
Weaving
-
Buy a loom, place it on the ground.
-
Select 100 lengths of yarn in your hoard, and click the loom to make cloth.
-
The quality of the cloth produced is the same as the quality of the yarn used.
-
A loom lasts for 1000 uses before it must be replaced.
Once you have 10 beggar's cloth and 10 beggar's yarn, you can
attempt to make a beggar's milking glove.
Your chances of success are dependent on your weaving skill. To make a middling
milking glove requires 20 middling cloth and 20 middling yarn. An attempt at an
imperial glove requires 30 imperial cloth and 30 imperial yarn.
Once you have raised your weaving skill a bit, you will want to attempt to make
a seed bag. Seed bags are made in the same
way as gloves, but your odds will be much lower!
Squirrels and Milk: Red Squirrels live
in Butternut trees. They can be milked once
a day to obtain milk, using a
milking glove.
Milk, when drunk, boosts your ability to fertilize,
break&scutch, lay down stalks for
retting, hackle fibres and
spin yarn - you can perform these tasks twice as fast.
When combined with a gold radish, you
can do any of these things five times as fast - but watch your health! The
other benefit of drinking milk is that when you scrape a statue, you will only
get level 20+ seeds. Instead of any level 11-19 seeds you will get EBP. When
you have also eaten a gold radish, you only get level 30+ seeds from statues.
This allows you to scrape statues loaded with poo without needing to clear out
so much space in your hoard, also the EBP is more valuable than the seeds you
would have otherwise got.
Idols: Idols
can be wittled from wood, however, beware! They are even harder to whittle than
scutching swords! Idols, as with all whittled items, must be whittled
in order of wood level. Once you have successfully whittled an idol, you can
attach it to a tree. The idol must be attached to the same type of tree as the
wood it was whittled from. Now you can start worshipping the idol, by feeding
it seeds. Select seeds of the same level as the idol, and click the idol. With
each click, the idol will take (tree level + 1) x 2 seeds (if available). This
costs you health so beware! In return, the idol will give you one seed of the
next highest level of tree.
Each idol has a power level, which is based on: Length of time idol has been
attached to the tree, age of the tree to which it is attached, number of seeds
which have been fed to it, and wood level.
The person with the highest-powered idol for a tree type is the
tree lord of that tree. This brings benefits such as increased odds
when whittling items from that type of wood.
Most Manual Updates are By Spider
last updated :: 2.9.2004
Project is incomplet
Dew to time restraint it is released as is, it will be updated as I have time. Mostly all that remains is crosslinking the page with it's self and checking to make sure all the info is uptodate. To Point out flaws PM Cali | Jessy in IRC.
|


